The User Interface (UI) is what the player uses to interact with the game. This generally refers specifically to menus, buttons, windows and similar elements that contain the information and tools the player needs to control their character and play the game. Many UI windows can have their scale and opacity adjusted, allowing you to customize your UI to your specific needs.
This page will help explain the various UI elements found within Pantheon: Rise of the Fallen.
Player Character UI
Many elements of the player's personal UI can be moved and have their height and width adjusted, allowing players to manipulate their UI for their personal play style.

The Compass helps you orient yourself and navigate the world of Terminus
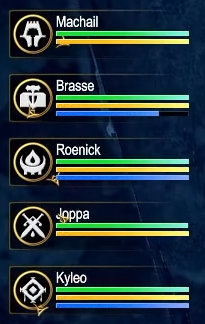
The group window is the player's primary means of determining their groupmate's status and resources.
- 1. The icon represents that player's class.
- 1a. The ring around the icon occasionally shows an arrow, which points toward that group mate's current location. It only displays if that groupmate shares the same zone as you, and is not within a certain distance of you.
- 2. The Green Bar measures that player's health points.
- 3. The Yellow Bar measures that player's endurance.
- 4. The Blue Bar measures that player's mana.
- 1. The icon represents that player's class.

The trade window is how players trade coins and tradeable items between each other.
- 1. The left section shows what you are offering to the other PC, while the right side shows what the other player is offering you.
- 2. Each player can trade up to 10 individual items. If an item can stack, players can trade any amount of that item and it will only count as one item for purposes of the trade limit.
- 3. Along the bottom, you can see how much coin you are offering, or being offered.

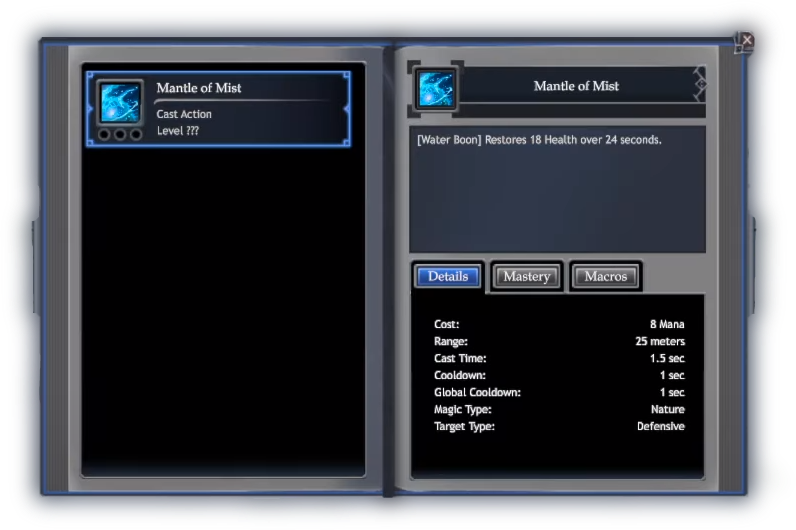
The spell effect window is how players determine which buffs and debuffs they are currently under the effects of. The colored border is multi-fucntional:
- 1. The color determines if the effect is positive or negative: yellow indicates it is a buff, while red indicates it is a debuff.
- 2. The border will gradually empty, going clockwise. This represents how long the effect has left.
The tool bar provides quick access to a handful of the other menus. From left to right:
- 1. Options menu.
- 2. Bug report menu.
- 3. ???
- 4. ???
- 5. Spell and Abilities book.
- 6. ???
- 7. ???
- 8. ???
Hot Bar / Action Bar
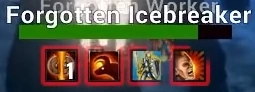
The Hot Bar (also know as the Action Bar) is the window that you add your abilities and spells to, so that you may use them during combat.
- 1. There are 8 primary slots that you can add abilities/spells to.
- 2. Above the primary slots, there are 5 additional slots that you can add abilities/spells to.
- 3. The numbers and symbols below the icons are showing what button is hotkeyed to activate that skill. For example, if the player presses the "3" button on their keyboard, they will cast the ability/spell in that slot.
The hotbar cannot be adjusted while you are in combat.
The Living Codex is has many functions. First of all, it is a collection of all the abilities and spells your character has learned. From this window, you can assign abilities/spells to your Hot Bar so that you can use them.
- 1. There are many sorting options available to help you search your abilities and spells, including level sorting and text searching.
- 2. The colored box beside the ability/spell icon informs you if the ability is Offensive (directly targets a hostile), or Defensive (doesn't directly target a hostile). Red is for Offensive, Blue is for Defensive.
- 2a. The number(s) within the colored square tell you the level of the spell at a glance.
- 3. Hovering over an ability/spell will display it's tool tip for more detailed information.
For more detailed information regarding The Living Codex, please see this page.
You can see the FAQ regarding The Living Codex Here
Character Sheet & Inventory
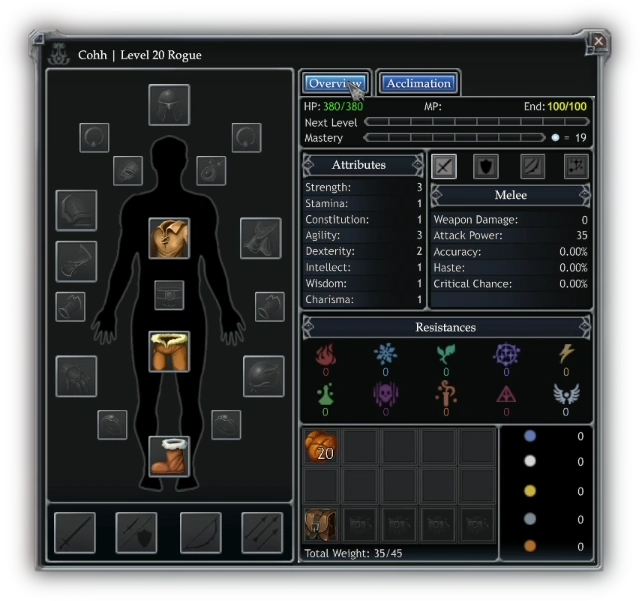
The Inventory is a multi-functional window.
- 1.Equipment Slots [Left] - All of your character's available equipment slots. Putting an item into these slots equips your character with that item, altering your statistics and--in some cases--your appearance.
- 1a. Weapon Slots [Below Main Equipment Slots] - These slots are where your primary weapon, secondary weapon/shield, ranged weapon and ammo are equipped.
- 1b. Character View [Below Weapon Slots] - A button to toggle the Equipment Slots window into a preview of your character's in-world appearance.
- 2. Overview [Top Right] - This section displays your Character's name, level and class. Your current and total health, resource and endurance are also listed.
- 2a. Experience Bars [Below Overview] - Two bars are displayed and represent your current character experience bar (yellow) and mastery experience (blue). The icon beside the Mastery Experience bar indicates how much Mastery Points you currently have available to use.
- 2b. Stat Information [Below Experience Bars] - This is a quick reference of your character's important statistics. Which stats are on display can be swapped by choosing a different category from the drop down menu along the top. For more detailed information regarding your character's Stats, please see this page
- 3. Tabs [Bottom] - These tabs will switch the window from your Character Sheet & Inventory. For information regarding these pages, see their respective sections below. [NOT PICTURED, 5-20]
- 3. Resistances [Below the Overview section] - The sum of your character's resistances.
- 4. Storage [Below Resistances] - This is where items you are carrying go. By default, your character only has 10 slots which they can carry items in (stacked items count as only 1 item for this purpose). To get more slots, you can acquire bags. For more detailed information on Bags, please see this page
- 5. Coins [Bottom Right] - This shows you which types of coins you are currently carrying, and how many. For more detailed information on Coins, please see this page
- 6. Weight Indicator [Below the Equipment Slots section] - Your character's current weight is listed on the left, and the maximum they are allowed to carry is on the right. Carrying above your weight limit will cause you to be encumbered.
- 1.Equipment Slots [Left] - All of your character's available equipment slots. Putting an item into these slots equips your character with that item, altering your statistics and--in some cases--your appearance.
For more detailed information regarding Factions, please see this page

For more detailed information regarding Acclimation, please see this page
Mastery XP Bar

This bar, typically seen along the very bottom of your screen, indicates how much experience you've earned toward gaining a Mastery Point. Much like your standard experience bar (see above), it gradually fills in with blue as you gain more experience.
For more detailed information regarding Mastery Points, please see this page
Action Timer Bar

This bar displays how long the current action/ability/spell is going to take. The numbers on the right indicate current progress and required time, respectively. The bar itself will also fill as the action completes.
Character Creation Screen

This screen allows you to create a player character.
- Top Left, Top. This window allows you to enter your character name. The small button along the top right of this field allows you to generate a random name to use. Note: The names generated are based on your current race selection.
- Top Left, Middle. This drop-down menu allows you to select what Race you'd like your character to be.
- Top Left, Middle 2. This drop-down menu allows you to select what Class you'd like your character to be, from those that are available to the Race you chose.
- Top Left, Bottom. These buttons allow you to select what Gender you want your character to be. Note: Your character's gender does not influence gameplay in anyway.
- Top Right, Top. This window displays your Race's starting attributes, and allows you to add or subtract attribute points. Note: You can only subtract attribute points that YOU allotted and you may not lower them below the starting value.
- Top Right, Bottom. This area shows you the amount of points you have left to allot, and also has a button to automatically allot your points for you based on class choice (left) or automatically reset your allotment to the default.
- Bottom, Left. This window displays a snippet of lore regarding your Race choice.
- Bottom, Center. These buttons confirm your character creation, or cancels the creation and returns you to the character select screen, respectively.
- Bottom, Right. This window displays a snippet of lore regarding your Class choice.
NPC UI
These UI elements provide information about Non Player Characters (NPCs) in the world, regardless of whether they are hostile or friendly.
The NPC health bar contains a lot of useful information regarding the current status of an NPC.
- 1. It tells you the NPC's name.
- 2. It shows you how much health points (HP) the NPC currently has. This is tracked by a green bar that empties as the NPC loses HP.
- 3. It shows you what status effects it is currently under, represented by the ability's icon shown beneath the health bar. Status effects can be either Beneficial (buffs) or Detrimental (debuffs). You can determine which type of status effect it is by the color surrounding the icon: green indicates its a buff, while red indicates its a debuff. The color also makes up the duration timer, which depletes as the status effect nears it's end. The icon will begin to flash when spells are within seconds of ending. Note the number within the first icon: this indicates that an effect has a stacking property, and tells you how much of this stacking effect the NPC is currently under.
- 4. If there is a cluster of targets, the NPC you are currently targeting will have an arrow pointing at the name. Additionally, the other NPC's names will be somewhat faded.
- 1. It tells you the NPC's name.
The current target health bar is largely the same as the standard health bar, but with some quality of life added:
- 1. This window can be moved.
- 2. It allows quick reference of what target you are currently attacking, useful when there is a group of NPCs and pivotal to your group's crowd controller.
- 3. It will display even when the NPC is no longer visible on screen (e.g: the NPC moved behind a wall.)
- 1. This window can be moved.

This window is displayed when you interact with a non-hostile NPC. It contains whatever the NPC has to say, whether that is lore or the beginnings of a Quest. From this window you can choose what to say to the NPC.
Old & Removed UI Elements Gallery
![(Click the image for a larger preview) The Hot Bar / Action Bar from pre-alpha. In this case, it has a Warrior's abilities on it. [Pre-alpha 2019].](https://static.wikia.nocookie.net/pantheonroft_gamepedia/images/6/62/UI_Hot_Bar.png/revision/latest/scale-to-width-down/120?cb=20191231223105) (Click the image for a larger preview)
(Click the image for a larger preview)The Hot Bar / Action Bar from pre-alpha. In this case, it has a Warrior's abilities on it. [Pre-alpha 2019].
![(Click the image for a larger preview) The Ability & Spell book from pre-alpha. [Pre-alpha 2019].](https://static.wikia.nocookie.net/pantheonroft_gamepedia/images/d/d8/OLD_UI_Ability_%26_Spell_Book.png/revision/latest/scale-to-width-down/120?cb=20210107052952) (Click the image for a larger preview)
(Click the image for a larger preview)The Ability & Spell book from pre-alpha. [Pre-alpha 2019].
![(Click the image for a larger preview) The Ability & Spell book from pre-alpha. [Pre-alpha, early 2020].](https://static.wikia.nocookie.net/pantheonroft_gamepedia/images/6/69/OLD_UI_Ability_%26_Spell_Book_2.png/revision/latest/scale-to-width-down/120?cb=20210107053100) (Click the image for a larger preview)
(Click the image for a larger preview)The Ability & Spell book from pre-alpha. [Pre-alpha, early 2020].
![(Click the image for a larger preview) The Ability & Spell book from pre-alpha. [Pre-alpha 2019].](https://static.wikia.nocookie.net/pantheonroft_gamepedia/images/d/d8/OLD_UI_Ability_%26_Spell_Book.png/revision/latest?cb=20210107052952)
![(Click the image for a larger preview) The Ability & Spell book from pre-alpha. [Pre-alpha, early 2020].](https://static.wikia.nocookie.net/pantheonroft_gamepedia/images/6/69/OLD_UI_Ability_%26_Spell_Book_2.png/revision/latest?cb=20210107053100)